
An Advanced Guide
This guide is incomplete.
Resources:
If you've managed to survive long enough for something to tear down your walls, even with repairs on them, then you know that upgrades are necessary. If you've been buying upgrades, then you also know that they get pretty darned expensive. Here's a few things to help with it.Level 7 mills- The ultimate lumbering machines. In order to even make one of these, you need to have an alchemist. In order to set up for this beast, you need a total of 32 mills. That's just enough mills for you to turn into 8 level 5 mills. once you have those level 5 mills, you can place them around a repair factory, and it will automatically upgrade to a level 7 mill.
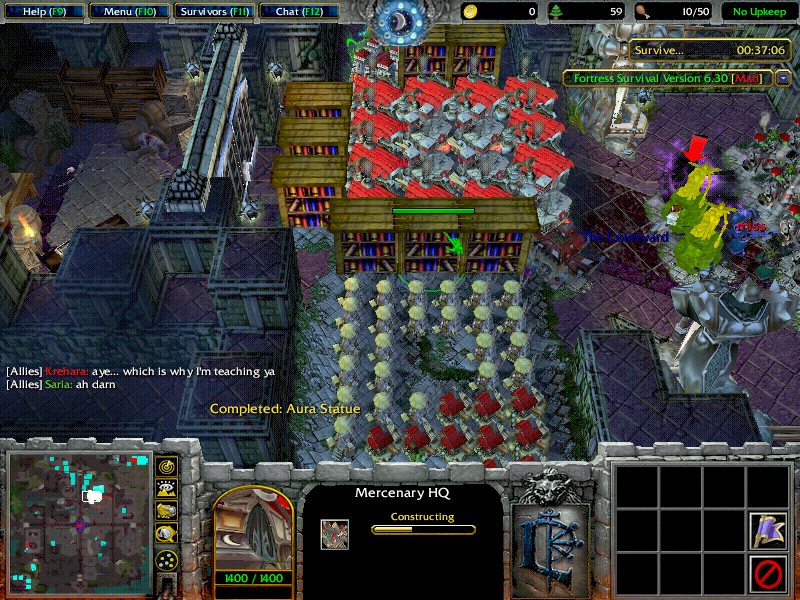
Pro tip: The factory doesn't actually have to be fully built. After you place the mills, just blink in and place your factory. It will initiate the build, and your builder will be moved outside of the mills.
Instead of upgrading mills to level 5, and then placing them around a factory, you can save time by putting the mills into place. If you upgrade to level 4 mills 4 at a time , you can control which ones will merge into a level 5. I generally upgrade the 4 mills in each corner first, then the rest can be mass upgraded.
Now then, 32 mills take forever to build, but there are ways to speed up this process. Remember those repair factories from the first guide? You can build a group of them to work together in order to build your stuff. A few examples of this, using the command center.
Times are approximations.
- Command center build time, no factories, 40 seconds.
- Command center build time, 1 factory, 25 seconds.
- Command center build time, 2 factories, 18 seconds.
- Command center build time, 3 factories, 15 seconds.
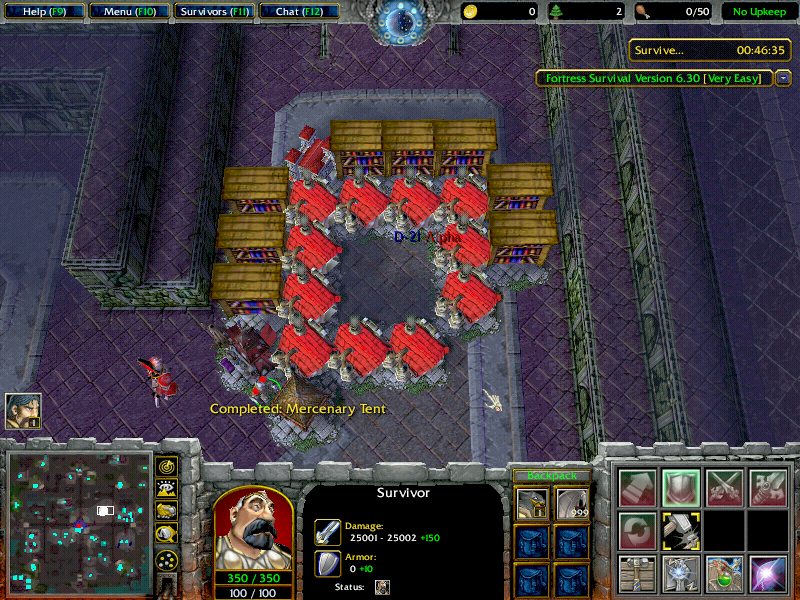
All of the buildings around the factories are in range of 3 factories.
You can fit 4 mills inside of this build.
3 of those mills will be helped by 7 factories, and the last will be helped by 6.
If you need to conserve mana, you can build an additional mill in the bottom right corner, where 4 mills will help it build.
With an alchemist unit or hero, you can use mass transmute to remove the mills, and have tiny versions of them in the alchemists inventory. After that, you simply blink your survivor back in and build more mills, and use your alchemist to place the tiny mills where you want them.
Note to self: Evaluate more builds later
There are more builds than this one that can be used. I'll use the following categories to evaluate them. If you don't like math, skip this part.Setup time- the amount of time needed to get set up factories before you can start lumbering, or building other buildings. In the above screenshot, it takes 2 minutes and 57 seconds to build the factories.
Assists/Mills- The total number of factories that help with each mill, divided by the number of mills. For this example, we will say 97 mills (that's 96 mills to make 3 level 7 mills, and one for a gold mine.)
- Using the build above, you can assume 27 total factory assists if you build 4 mills, or 31 if you build 5. it would take 24 sets of mills+1 mill if you build 4 at a time, or 19 sets+2 if you build 5 at a time.
- Using the formula of assists*sets, this becomes either 27*24, or 31*19. For the + mills, assume that they built in the spot within range of the most factories.
- So, 27*24= 648. Add 7 for the last mill, and you get 655. Divide by the total number of mills (97) and the average assist per mill comes out to be 6.75.
- 31*19= 589. Add 14 for the last 2 mills and you get 603. Divide by the total number of mills (97) and the average assist per mill comes out to be 6.22.
Gold
Ok, enough about mills for now. Let's talk gold. When is the best time to get a gold mine up? As soon as you can spare the lumber for it. Once it's built, you can either let the gold build up for later in the game, or trade it in for a nice little lumber boost early on. Letting the gold build up early means that you won't have to buy a lot later, which will save you thousands of lumber. I usually set the first mill I build to the side, so that it can become a gold mine later.Another way to get gold is to kill bosses. At 2 gold per boss, this can be a MASSIVE boost early in the game, as you can trade that in for 80 lumber or use it to upgrade to better statues.
Books
Now then, allow me to introduce you to a favorite little tactic of mine, which I will refer to as "book rushing." Whoever came up with this tactic is a genius. This involves building your bookshelves as early as possible, and selling the books/tomes (tomes are used instantly in 6.42, and can't be sold.. this can still be used, but not as effectively) at a vendor. Using this tactic, you take the 10 lumber spent on the Books upgrade, and turn it into several hundred to be spent as needed. If you use a lumbering setup, you can refer to previous screenshots to see how the shelves can be built around your lumber area. If you are basing alone, and you need to get the alchemist unit, this can speed you along nicely. Also, if you are basing with someone, a waller can use this tactic to make things easier on a lumberer at the start of a match.But what if you're walling, and you don't have a lumber area because someone else is lumbering? Fear not, there's a way to pull this off without a lumber area. You just need your lumberer to send you the first 10 lumber they make.
First off, start with 4 factories.
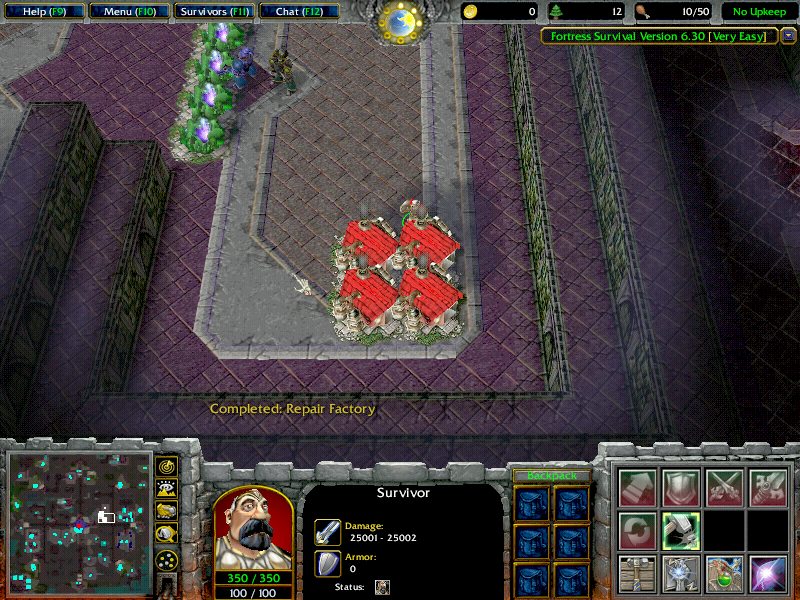
Then you build a command center one one side, and research the books upgrade.
Once that's done, you can start building the bookshelves, like so.
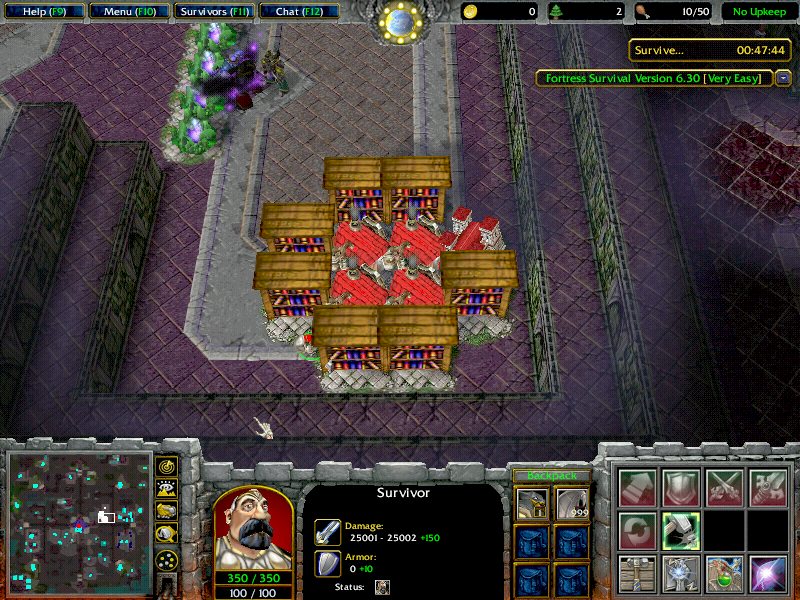
Now, here's where things get tricky. With your builder selected, press A and click one of the factories. He will destroy the factory. Now, you can blink into the spot where the factory was, and build your last bookshelf. With this build, all of the buildings up to this point have been assisted by 3 factories.
Now then, let's take things a step further.
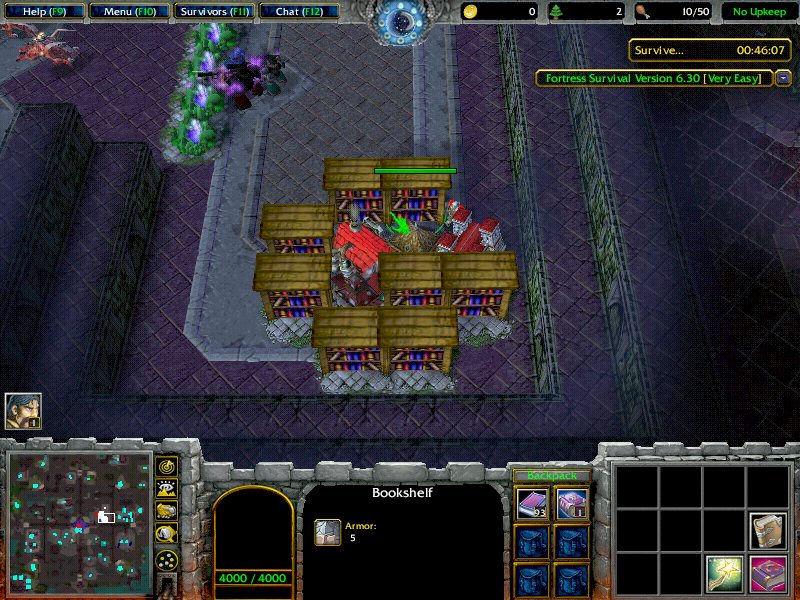
By attacking the other factories and blinking into their empty spots, you can also fit your vendor and mercenary tent in as well. And the final result, is that you have all of your utility buildings in one nice, neat little bundle.
And you have your own supply of lumber.
With this tactic, combined with a good wall/repair setup, an armor statue, and some slowing/stun towers, you can last until there are about 32 minutes remaining on mad difficulty before needing any more lumber from the lumberer. At this point, I would suggest that you stop selling books and start saving them to unlock the highest level upgrades, and that you start using the tomes to increase the strength of your hero.
Your lumberer can book rush as well, and by the time you would need lumber from them they can have their first level 7 mill up already.
Walls:
In the last guide, I showed a build consisting of a straight wall, with the repairs placed for the maximum effect for that build. There are other ways to build a wall, and I'll be going over some of them nowThe first build is similar to the straight wall build, with one slight twist. The middle walls are built slightly further into the base.
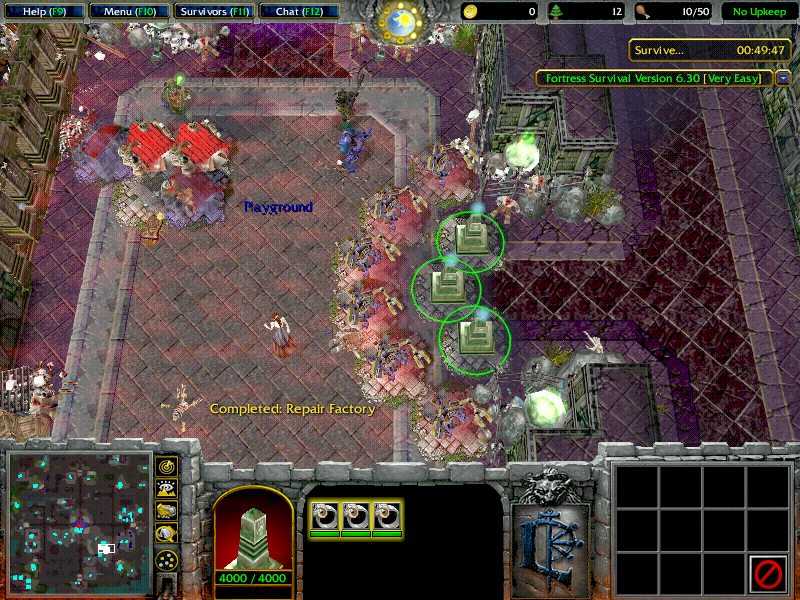
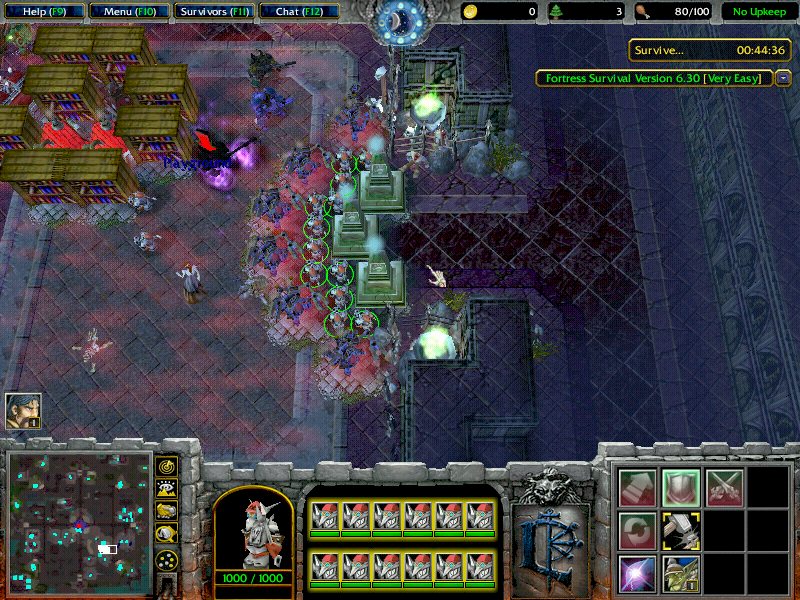
This dedicates 4 bots to the middle wall, 3 to each side wall, and 2 that can alternate between the middle and sides as needed.
Also, if you use units to tank, you can cram them into that space just in front of the middle wall. Doing so limits the number of attackers that can reach them, increasing their life expectancy.
Now then, in some cases you can set up your walls in a diagonal pattern. By doing this, you can take a base like the harbor, which would normally have 2 entrances, and block it off in a way that only requires one wall. I don't have a screenshot at the moment, so I'll hold off on discussing this build for now.
Emergency Situations:
Oh crap, I lost a wall! Stealer is barbecuing my repairs, the Snowman ate my hero, and Pheng is tap-dancing all over my lumber mills, WHAT DO I DO?!If you have bosses rampaging through your base like this, then it's probably already too late and your best bet is to run to someone elses base. So, here's what you can do to keep the situation from getting out of hand.
The number one priority in this situation is to get whatever broke through, back outside of your base (or killed), and then to plug the hole.
First off, it can be helpful to notify other players. If someone has the rocketeer, they can drop a nuke on the enemies, dealing damage and drastically reducing their attack speed. If someone has the commander, they can drop paratroopers in to help. If someone has the astronomer (coming soon) they can summon infernals, stunning mobs and tanking for you. Any of these might be enough to buy you enough time to save yourself.
However, outside help is not guaranteed.
So, if you're on your own, try to lure out or kill the mobs. If you can't get them out, it's game over either way. Once you manage to clear the base, you can purchase walls from the vendor. Building a wall entirely from scratch usually won't work, because it will have so little health and take so long to upgrade that it will be destroyed in one hit before it's strong enough to hold. So, take the walls from the vendor and plug the gap. If the wall needs to be upgraded, it might be a good idea to buy some additional walls to build in front of it as a stall.
Now then, if a wall is just failing, it might be possible to save it.
Buying armor upgrades and upgrading your armor statue can work, if you can find ways to distract the enemy long enough.
You can buy some walls from the vendor, and plant them behind the mobs attacking the wall. In theory, some of the mobs might turn to focus on that wall, buying you some time.
Another thing that can be done, is to research Solar Batteries or Lunar Mist from the command center.
If you have any units that can be sacrificed, you can blink them out into the mobs, buying yourself a few more seconds of time.
Lastly, Medics obtained from the mercenary tent have two moves that can heal walls. One of these moves is global, meaning that you can heal a base on the other side of the map, or that they could heal yours.
If your walls have broken, or are failing, there are two likely causes for this. It can be one or both that leads to failure.
- You don't have enough wall armor.
- Your repairs are not strong enough.
The second is a much more difficult issue to handle. Your mechanics do not repair while upgrading, and if your wall is dying, they won't upgrade fast enough to save it. I suggest upgrading repair bots if possible, and researching Solar Batteries/Lunar Mist, depending on whether it's night or day.
One last thing that can be very helpful for keeping a wall up, are repair keys. You can purchase them from the Librarian, for 2 lumber per key. If placed on an aura statue, they will automatically be used to heal a wall in range that has low health. They are effective, and have a very short cooldown. However, due to that short cooldown, if two walls are failing at the same time, one will break.
It takes practice to get a feel for how quickly you should upgrade wall armor and repairs, and that feel changes depending on the difficulty, so don't worry too much about messing up before you master it. Even something like playing on normal difficulty for a couple matches can mess up your timing if you move up to a harder difficulty.
Ranges:
One of the most important things to keep in mind when building is range. When it comes to towers and aura statues, their ranges will increase with each upgrade. The size of a single square on the map is 48x48. You can mouse over a unit/towers attack to see it's range. If you have a unit/tower with a range of 650, you could divide that by 48 (650/48) and see that it can attack something 13.5 squares away. When it comes to repairs, mechanics have a range of 70, and factories have a range of 130.Now, knowing the difference in repair ranges in crucial if you want a more effective lumber setup. If you shift the factories so that they're slightly off with the mills, a single factory can help build 4 mills. A mechanic could only help with two.
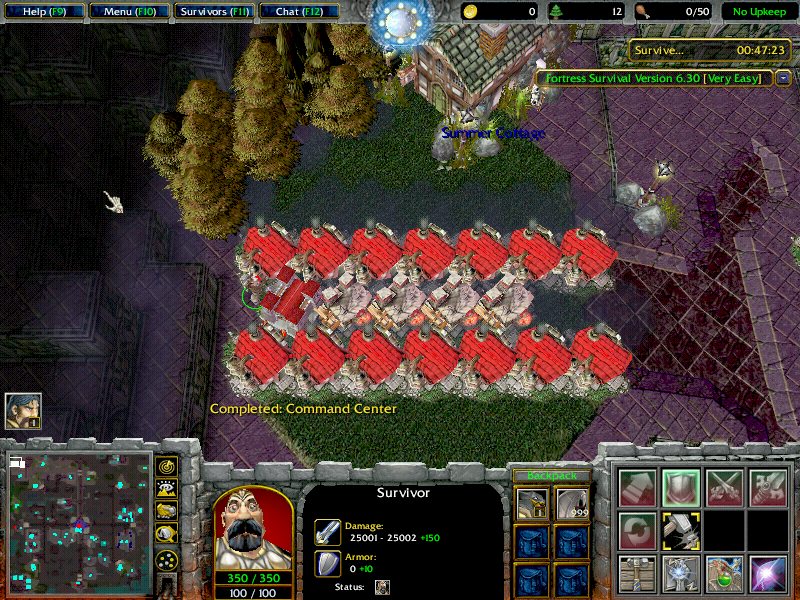
Each of the mills in this setup are assisted by 8 factories. I build the command center to the side like that as a placeholder, so that I have a clear starting point for my mils. The command center is assisted by 6 factories. You can also place other buildings on the outside, above and below where the mills would be, allowing for 4 factories to help with each building. Taking roughly 3 minutes and 30 seconds to set up, I like to use this build for soloing if I have the space for it.
Now then, if you want to go REALLY over the top, you can do something like this
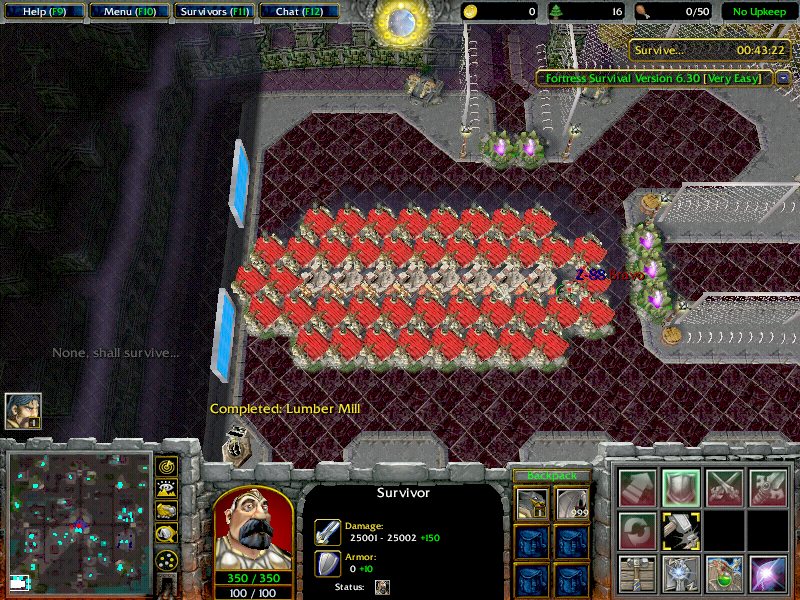
This build has a VERY high assist rate, and if you know how to chain commands together using the shift key, your builder can potentially never stop building. As far as assists go, you get an average of 10.5 assists per mill.
Unfortunately, due to the size of this build only a handful of bases could hold it. Also, using 41 mills, this build takes over 7 minutes to complete.
In conclusion, this could be an excellent build if you are lumbering a waller.
Random Strategies!
There are some strategies FS that you will rarely see. I can think of three, and if anyone else knows of one please share and I'll post it here.I'll refer to this one as Boss Hunting. A player using this strategy will build in someone else's base, but won't actively help that player. Instead, all of their resources will go towards pumping up their hero, which they will use to track down and eliminate bosses. They will also go to bases that need help, and clear off the walls for additional experience for their hero.
I will call the second strategy Middling. A player using this strategy will base in the middle of the map, with all of the defender heroes. In older versions, of the map, 2 players using this strategy and commander heroes could survive the entire match and kill behemoth. In the current version, it's most likely a stall tactic, possibly surviving until Lt. Stealer arrives. It's a very nice stall for all of the other players in the map.
The last strategy is Reinforcement Spam. A player using this strategy will build mass sentry posts, summoning hundreds of paratroopers. While the paratroopers help to kill enemies, it can be considered a troll tactic in public games. Mass paratroopers can result in desync, or fatal errors resulting in the game crashing, so be wary of this if you decide to use this tactic.
Tips:
-Wall level isn't everything. You need wall armor, or no amount of repairs or health will save you.
-If you are still relatively new, try to base with someone. One of you can focus on the wall, while the other can focus on resources.
-If you are playing alone, you need to build your defenses and resources up at the same time. It takes practice to get good enough to handle this.
-When issuing a command to your builder, you can make a list of commands for him to follow. For example...
- Hold shift while placing a building if you are going to build more than one of that building. Your builder will start building it. Now, you can hold shift and place the building again. You will see a silhouette of the building appear, and your builder will start working on it immediately after the first one finishes.
- You can also hold shift while issuing other commands. such as blink or attack. By giving your builder a list of commands to follow, you can make sure that he stays active, and spend more attention on the rest of the base.
A few tips for the bosses:
-Wizards can remove evade, but the last 3 bosses will go magic immune when they are almost dead
-Snipers are the best single target mercenaries you can hire
-Lt.123HELLO can be very useful, buffing the damage of both units and heroes.
-You can buy items from the vendor to make your hero stronger
There's more to come with this guide, check back later!
- Nevo likes this
| Author Credit: | Posted By Krehara As Topic - 07/07/13 Re-Posted By Nevo As Guide - 10/06/15 |









0 Comments