


Newcomers Welcome
Submitted by
Krehara
, Jul 04 2013 05:09 PM | Last updated Jun 11 2015 01:31 AM
Introduction:
I remember the first time I played Fortress Survival. It was version 4.6, and I didn't have a clue what was going on. We've come a long way since then, and there's even more to figure out than there was when I first started. Long story short: I've decided to make a guide. I've seen plenty of people struggling with the game, and while I do help those I can, there are others I will likely never meet. So, I'm putting this together, in the hopes of it being spread by other players, to educate our newest players. If you already know the game, you probably won't benefit any from this guide, but I ask you to take a look at it anyways, and point out anything I miss so that I can correct it.
If you need this guide, then I must be honest with you. This guide won't teach you how to beat the game. You might survive, but you will probably need someone to help you through the game and kill the last bosses. But this guide will lay the groundwork for you. From there you can find your own path, or move on the advanced guide that I will make soon.
Objective:
The point of this map is to survive. The most basic strategy for this is to find a room to hide in, build walls to block it off, repairs to keep the walls up, and towers to kill the enemies.
Walls:
I'll start with the most essential thing, walls. Without them, you have to run laps around the map for an hour trying to dodge all of the mobs. There are two types of walls, Barricades and Regenerating.
Barricades- These have a high amount of health, and build very quickly. Their armor comes entirely from Wall Armor upgrades. At the end of the match, they will have the most health. With full armor upgrades, these walls will end the match with 55 base armor.
Regenerating Walls- These have a low amount of health, and take a bit of time to build, but they regenerate health on their own. They gain 1 armor each time they are upgraded, but benefit from wall armor upgrades less than barricades do. These walls will end the match with 64 base armor, as of version 6.41.
Now, where should you put these walls? At the entrance, of course. But there's a trick that lets you get more repairs on them. By building them halfway into your base, you can get repairs on the sides of the walls as well as behind the walls.
So, you've placed your walls, and now you're debating on how to keep them alive. In this part, I'll go over the uses for each type of repair you can build.
Repair Factories- These repairs have a repair range of 2. That means that they can repair something right next to them, AND something directly on the other side of it. Repair factories cannot be upgraded, but you can use them to create repair bots.
***One thing to note about repairs (excluding bots) is that if they are not currently repairing something, they will increase the building speed of anything you build within their range. I will go more in depth with this later on, or in a more advanced guide.
Towers:
So, now that you know what to do with your walls and your repairs, we'll discuss the final part of your defense. I'll go over the various towers, as well as my setup, and you can come up with your own strategy.
Assassin Towers- These do a small amount of hero damage, but they do bonus damage to bosses (but less damage to normal mobs), have the ability to crit, and come equipped with a poison that slows enemy attack rate while also causing damage.
Frost Towers- These do magic damage, and come with a slow effect that will stack with the Assassin's poison.
Flame Towers- These do chaos damage, which means that they do full damage against all armor types.
Rock Throwers- These do siege damage, and have a chance to stun each time they hit.
Tesla coils- Piercing damage. Low attack, high attack speed.
Arrow Towers- These do piercing damage. They build quickly, and their first few upgrades are free.
Peasant Launchers- These do siege damage. They have a splash effect, making them very strong against groups of enemies, but do only half damage to bosses.
Arcane towers- Magic damage. They have a mana burning effect.
Gravity Disruptor- These do a relatively small amount of normal damage, but have a very large range.
Minigun Turrets- These are anti-air turrets. In most public games, they won't be necessary, as you won't be playing with air.
Aura statues- NOTE, THESE ARE NOT TOWERS. But they should be built in with your towers, as they can be upgraded to provide additional armor or damage to buildings within range.
(Note to self: Include tower Magic abilities later)
***Bear in mind that the final bosses have a move which makes them immune to magic damage.
Resources:
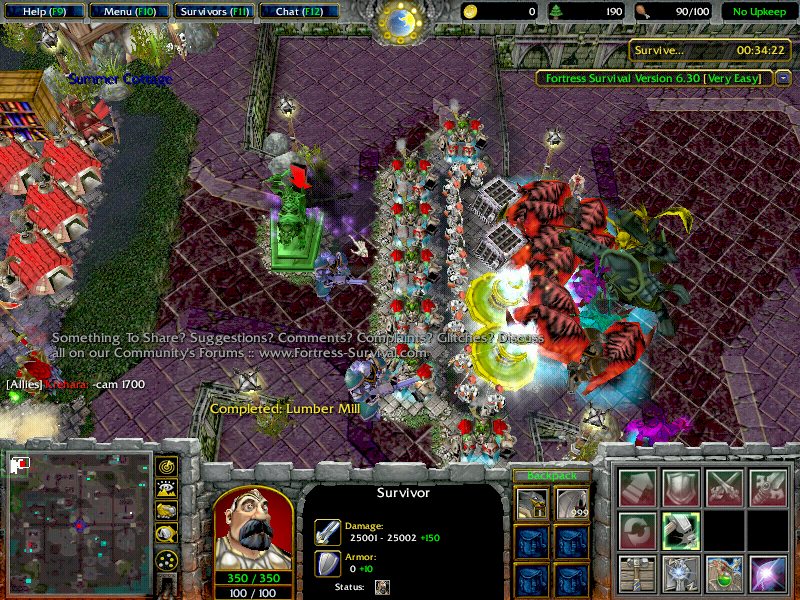
Now that you know how to build your wall, repairs, and towers, you now know how to manage your basic defense. But basic isn't good enough to survive, which is where lumber comes in. By building and upgrading lumber mills, you gain the resource needed to start buying repairs and upgrades. Many upgrades are contained within your command center.
Level 1 mills are obtained simply by building them
Level 2 mills are upgraded from level one
Level 3 mills are upgraded from level 2
Level 4 mills are upgraded from level 3
Level 5 mills are where you start to do tricks. To get a level 5 mill, build 4 regular mills in a square. When the 4 mills hit level 4, they will automatically upgrade to level 5.
Level 6 mills can be obtained two ways. You can either choose to upgrade them from level 5->6, or you can build 8 mills around a repair factory. When the 8 mills hit lvl 4, they will automatically upgrade to level 6.
Level 7 mills require a bit of planning to make. I'll go over them in the advanced guide.
Lumber is good and all, but it's not quite enough to win in version 6.3. You will also need gold. Gold is used to purchase high level upgrades, and can be obtained either through a gold mine, or buy purchasing it from the vendor. To build a gold mine, you upgrade a mill to level 4, and choose the goldmine upgrade. Each person may own only one gold mine. It can be upgraded to a level 2 gold mine.
With lumber and gold in hand, you stand a chance of surviving on one of the easier difficulties. But to seal the deal, or hope to survive on a harder difficulty, you need books. Books will unlock the highest level upgrades for walls, repairs, and aura statues. To get books, first research them in the command center, and then build bookshelves. The bookshelves will make books over time.
Units:
Perhaps the strongest unit you can recruit is your hero. You can recruit him from the Command Center. At higher ranks, you will unlock more heroes.
If you build a Mercenary Tent, you will be able to summon troops to aid you. I'll go over the troops right fast.
-Level 1 Mercenary Tent
-Swoardsman-Fast melee attack unit
-Mine Layer- Lays mines, has no attack
-Light Scout- Fast moving unit, high vision, no attack
-Light Marine- Free short ranged defender
-Level 2 Mercenary Tent
-Gladiator- Fast melee attack unit
-Potions Master- Ranged unit, deals chaos damage, has a slowing effect
-Body Guard- Melee defender with high health
-Siege Machine- Powerful melee unit with high attack and health
-Medium Marine- Free short ranged defender
-Level 3 Mercenary Tent
-Alchemist- Ranged unit, can shrink mills
-Lt.123HELLO- Expensive short range unit, chaos damage, buffs damage and armor of nearby allies
-Firebat-Short range unit
-Rocketeer- Expensive ranged unit, strong splash damage
-Exterminator-Anti air unit
-Wizard- EXTREMELY useful ranged unit. Has polymorph, which will remove a boss' evade, and a slow that will stack with assassins' poison and frost towers slow.
-Medic- Healer. Has a global move that heals structures in an area, great for saving other bases or your own.
-Sniper- Highest damage marine. Comes with crit. A crew of these will dismantle creatures in seconds.
-Marines- Medium range defender. Chance to stun on each attack.
Note: If you plan to use units, make sure that your build allows space for them to actually help. A firebat stuck behind 4 rows of towers is a waste of space.
You now know the basics of the game. But in order to win, not just survive, you need to be able to kill the last three bosses, Trojan/Najort/Behemoth. In this version, they have a high amount of evade, so you need more than towers, more than units, and more than just your hero in order to kill them. You will have to combine all three elements.
Tips:
-Wall level isn't everything. You need wall armor, or no amount of repairs or health will save you.
-If you are still relatively new, try to base with someone. One of you can focus on the wall, while the other can focus on resources.
-If you are playing alone, you need to build your defenses and resources up at the same time. It takes practice to get good enough to handle this.
A few tips for the bosses:
-Wizards can remove evade, but the last 3 bosses will go magic immune when they are almost dead
-Snipers are the best single target mercenaries you can hire
-Captain can be very useful, buffing the damage of both units and heroes.
-You can buy items from the vendor to make your hero stronger
I remember the first time I played Fortress Survival. It was version 4.6, and I didn't have a clue what was going on. We've come a long way since then, and there's even more to figure out than there was when I first started. Long story short: I've decided to make a guide. I've seen plenty of people struggling with the game, and while I do help those I can, there are others I will likely never meet. So, I'm putting this together, in the hopes of it being spread by other players, to educate our newest players. If you already know the game, you probably won't benefit any from this guide, but I ask you to take a look at it anyways, and point out anything I miss so that I can correct it.
If you need this guide, then I must be honest with you. This guide won't teach you how to beat the game. You might survive, but you will probably need someone to help you through the game and kill the last bosses. But this guide will lay the groundwork for you. From there you can find your own path, or move on the advanced guide that I will make soon.
Objective:
The point of this map is to survive. The most basic strategy for this is to find a room to hide in, build walls to block it off, repairs to keep the walls up, and towers to kill the enemies.
Walls:
I'll start with the most essential thing, walls. Without them, you have to run laps around the map for an hour trying to dodge all of the mobs. There are two types of walls, Barricades and Regenerating.
Barricades- These have a high amount of health, and build very quickly. Their armor comes entirely from Wall Armor upgrades. At the end of the match, they will have the most health. With full armor upgrades, these walls will end the match with 55 base armor.
Regenerating Walls- These have a low amount of health, and take a bit of time to build, but they regenerate health on their own. They gain 1 armor each time they are upgraded, but benefit from wall armor upgrades less than barricades do. These walls will end the match with 64 base armor, as of version 6.41.
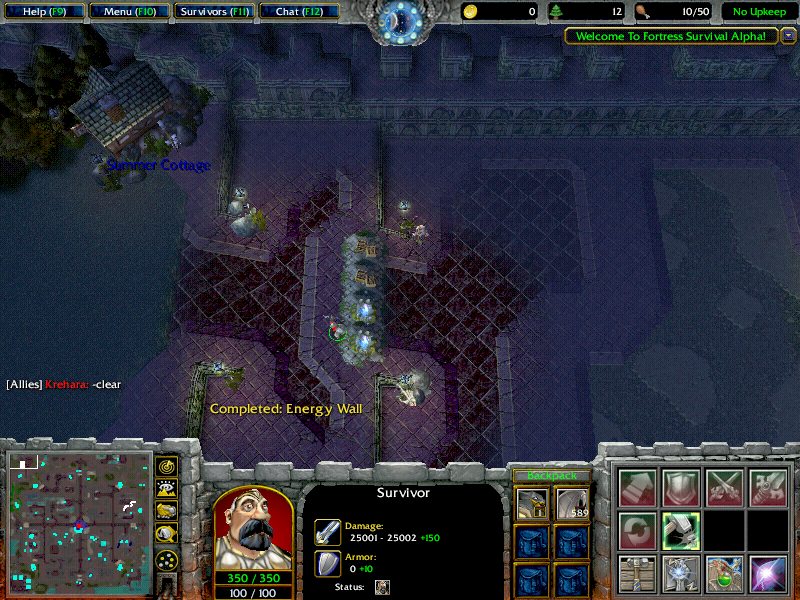
Regular barricades on the top, Energy walls on the bottom.
Note: There are other ways to build your walls. I will discuss them in my next guide.
It's up to the player to decide which one they want to go with.Now, where should you put these walls? At the entrance, of course. But there's a trick that lets you get more repairs on them. By building them halfway into your base, you can get repairs on the sides of the walls as well as behind the walls.
Building like this allows you to fit more mechanics on the wall
Repairs:So, you've placed your walls, and now you're debating on how to keep them alive. In this part, I'll go over the uses for each type of repair you can build.
Repair Factories- These repairs have a repair range of 2. That means that they can repair something right next to them, AND something directly on the other side of it. Repair factories cannot be upgraded, but you can use them to create repair bots.
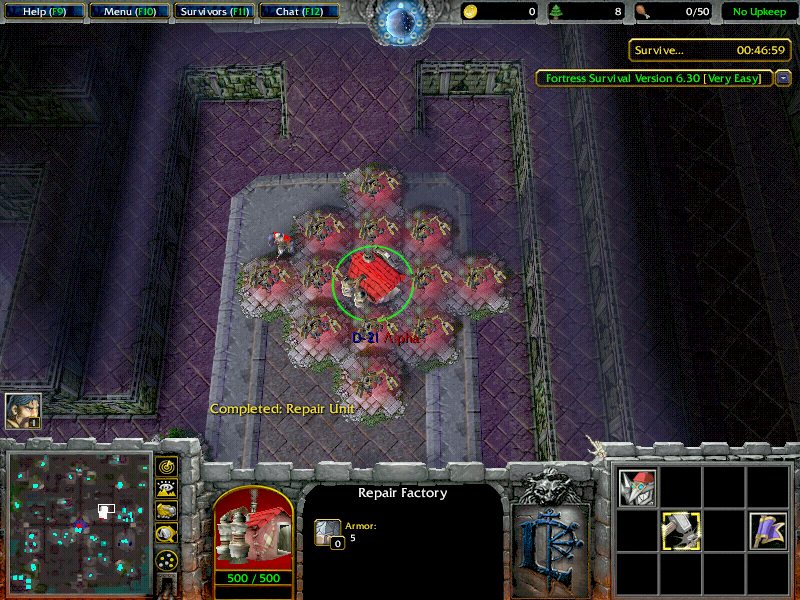
The factory in this picture speeds up the building speed of the buildings around it
Mechanics- These repairs have a range of 1. They can repair something right next to them, or something that is 1 unit away. These can be upgraded, and are best used for the wall.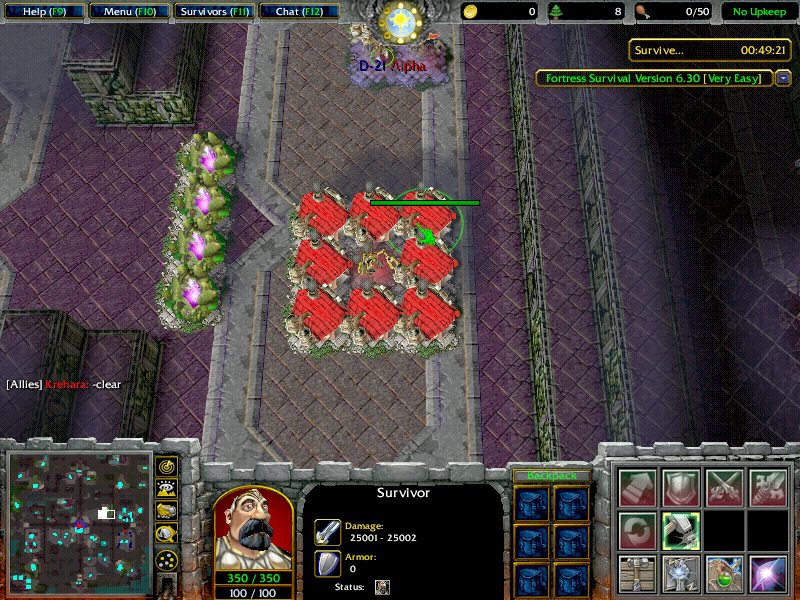
The mechanic in this picture speeds up the building speed of the buildings around it
Repair bots- These are units that can repair anything in melee range of them. They can be upgraded. If you leave 1 unit of space between your walls and Mechanics, you can fit bots in between them, boosting your repair rate significantly.
***One thing to note about repairs (excluding bots) is that if they are not currently repairing something, they will increase the building speed of anything you build within their range. I will go more in depth with this later on, or in a more advanced guide.
Towers:
So, now that you know what to do with your walls and your repairs, we'll discuss the final part of your defense. I'll go over the various towers, as well as my setup, and you can come up with your own strategy.
Assassin Towers- These do a small amount of hero damage, but they do bonus damage to bosses (but less damage to normal mobs), have the ability to crit, and come equipped with a poison that slows enemy attack rate while also causing damage.
Frost Towers- These do magic damage, and come with a slow effect that will stack with the Assassin's poison.
Flame Towers- These do chaos damage, which means that they do full damage against all armor types.
Rock Throwers- These do siege damage, and have a chance to stun each time they hit.
Tesla coils- Piercing damage. Low attack, high attack speed.
Arrow Towers- These do piercing damage. They build quickly, and their first few upgrades are free.
Peasant Launchers- These do siege damage. They have a splash effect, making them very strong against groups of enemies, but do only half damage to bosses.
Arcane towers- Magic damage. They have a mana burning effect.
Gravity Disruptor- These do a relatively small amount of normal damage, but have a very large range.
Minigun Turrets- These are anti-air turrets. In most public games, they won't be necessary, as you won't be playing with air.
Aura statues- NOTE, THESE ARE NOT TOWERS. But they should be built in with your towers, as they can be upgraded to provide additional armor or damage to buildings within range.
(Note to self: Include tower Magic abilities later)
***Bear in mind that the final bosses have a move which makes them immune to magic damage.
Resources:
Now that you know how to build your wall, repairs, and towers, you now know how to manage your basic defense. But basic isn't good enough to survive, which is where lumber comes in. By building and upgrading lumber mills, you gain the resource needed to start buying repairs and upgrades. Many upgrades are contained within your command center.
Level 1 mills are obtained simply by building them
Level 2 mills are upgraded from level one
Level 3 mills are upgraded from level 2
Level 4 mills are upgraded from level 3
Level 5 mills are where you start to do tricks. To get a level 5 mill, build 4 regular mills in a square. When the 4 mills hit level 4, they will automatically upgrade to level 5.
Level 6 mills can be obtained two ways. You can either choose to upgrade them from level 5->6, or you can build 8 mills around a repair factory. When the 8 mills hit lvl 4, they will automatically upgrade to level 6.
Level 7 mills require a bit of planning to make. I'll go over them in the advanced guide.
Lumber is good and all, but it's not quite enough to win in version 6.3. You will also need gold. Gold is used to purchase high level upgrades, and can be obtained either through a gold mine, or buy purchasing it from the vendor. To build a gold mine, you upgrade a mill to level 4, and choose the goldmine upgrade. Each person may own only one gold mine. It can be upgraded to a level 2 gold mine.
With lumber and gold in hand, you stand a chance of surviving on one of the easier difficulties. But to seal the deal, or hope to survive on a harder difficulty, you need books. Books will unlock the highest level upgrades for walls, repairs, and aura statues. To get books, first research them in the command center, and then build bookshelves. The bookshelves will make books over time.
Units:
Perhaps the strongest unit you can recruit is your hero. You can recruit him from the Command Center. At higher ranks, you will unlock more heroes.
If you build a Mercenary Tent, you will be able to summon troops to aid you. I'll go over the troops right fast.
-Level 1 Mercenary Tent
-Swoardsman-Fast melee attack unit
-Mine Layer- Lays mines, has no attack
-Light Scout- Fast moving unit, high vision, no attack
-Light Marine- Free short ranged defender
-Level 2 Mercenary Tent
-Gladiator- Fast melee attack unit
-Potions Master- Ranged unit, deals chaos damage, has a slowing effect
-Body Guard- Melee defender with high health
-Siege Machine- Powerful melee unit with high attack and health
-Medium Marine- Free short ranged defender
-Level 3 Mercenary Tent
-Alchemist- Ranged unit, can shrink mills
-Lt.123HELLO- Expensive short range unit, chaos damage, buffs damage and armor of nearby allies
-Firebat-Short range unit
-Rocketeer- Expensive ranged unit, strong splash damage
-Exterminator-Anti air unit
-Wizard- EXTREMELY useful ranged unit. Has polymorph, which will remove a boss' evade, and a slow that will stack with assassins' poison and frost towers slow.
-Medic- Healer. Has a global move that heals structures in an area, great for saving other bases or your own.
-Sniper- Highest damage marine. Comes with crit. A crew of these will dismantle creatures in seconds.
-Marines- Medium range defender. Chance to stun on each attack.
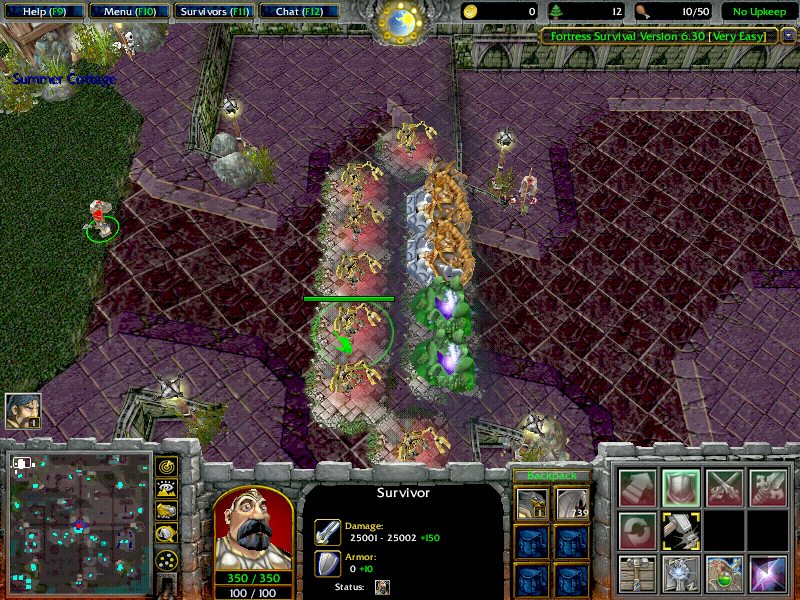
Note: If you plan to use units, make sure that your build allows space for them to actually help. A firebat stuck behind 4 rows of towers is a waste of space.
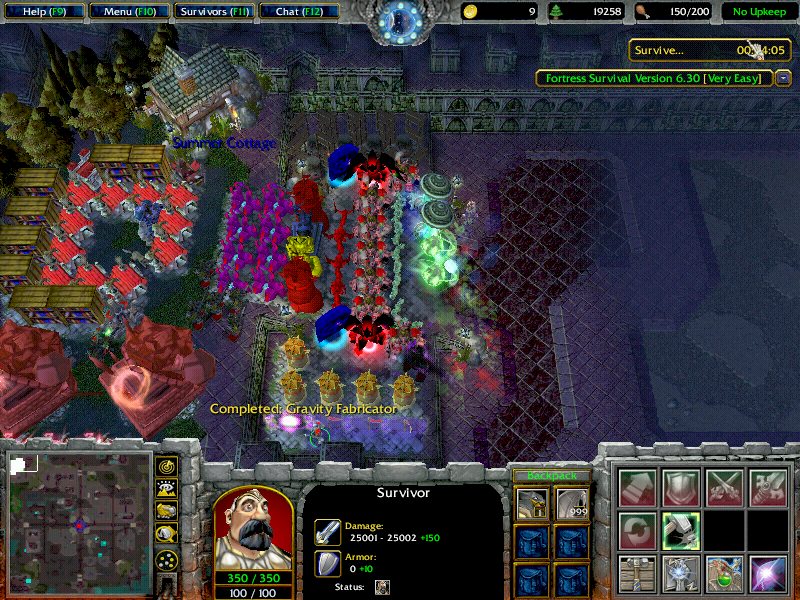
With this build, you can see a space just above the rock throwers where units can fit. There's an identical space on the top side of this defense as well.
Winning:You now know the basics of the game. But in order to win, not just survive, you need to be able to kill the last three bosses, Trojan/Najort/Behemoth. In this version, they have a high amount of evade, so you need more than towers, more than units, and more than just your hero in order to kill them. You will have to combine all three elements.
Tips:
-Wall level isn't everything. You need wall armor, or no amount of repairs or health will save you.
-If you are still relatively new, try to base with someone. One of you can focus on the wall, while the other can focus on resources.
-If you are playing alone, you need to build your defenses and resources up at the same time. It takes practice to get good enough to handle this.
A few tips for the bosses:
-Wizards can remove evade, but the last 3 bosses will go magic immune when they are almost dead
-Snipers are the best single target mercenaries you can hire
-Captain can be very useful, buffing the damage of both units and heroes.
-You can buy items from the vendor to make your hero stronger
- Nevo and Waffle(est) like this
| Author Credit: | Posted By Krehara As Topic - 04/07/13 Re-Posted By Nevo As Guide - 10/06/15 |


0 Comments